How to Install Tile Underlay for Wet Areas
Tile underlay is the fibre cement sheet that goes between a timber floor (or particleboard sheet flooring) and the tile bed in a bathroom, laundry or kitchen. It gives the tiles a rigid, stable base and stops the floor from flexing as you walk, which would crack the grout lines and eventually the tiles themselves.
Over a concrete slab you do not need tile underlay - tiles go directly into the slab with a self-levelling screed if required. Over timber, it is non-negotiable.
What tile underlay is
A 6 mm or thicker fibre cement sheet, typically supplied in 1200 x 900 mm or 1200 x 1800 mm formats. Manufacturers print a dot pattern on the sheet that marks recommended nail or screw positions, so you do not have to plan the fixing pattern yourself.
The sheet sits on a bed of stud adhesive and is mechanically fixed with underlay nails or screws. Together, the adhesive and fixings stop the sheet from flexing or rocking on the substrate underneath.
Tools and materials
- Fibre cement tile underlay (calculate sheet count plus 5 percent waste)
- Acrylic stud adhesive (cartridges for caulking gun)
- Caulking gun
- Underlay nails (the most common option) or specified screws
- Hammer or impact driver
- Tape measure, pencil, square
- Fibre cement scoring tool or fine-tooth saw
- Dust mask, eye protection (cutting fibre cement creates silica dust)
- Notched trowel (only if you are bedding the sheet into adhesive across the whole back, which some specs require)
Step 1: Check the substrate
The timber floor or particleboard underneath must be:
- Solid. Tighten any loose floorboards or sheet flooring. Loose substrate transfers movement straight through the underlay into the tiles.
- Flat. No bumps, no dips greater than a couple of millimetres. Use a long straightedge to check.
- Clean and dry. Sweep, vacuum and let the floor dry fully. Adhesive will not bond to dust or moisture.
- Structurally adequate. Joist spacing and floor structure must meet the tile underlay manufacturer’s specification. Underlay does not compensate for an under-engineered floor.
Step 2: Plan the sheet layout
Lay the sheets in a brick pattern - each row offset by at least 100 mm from the joints in the row beside it. Joints between underlay sheets must not coincide with joints in the substrate underneath; stagger them by at least 100 mm, so the underlay bridges across the substrate joints.
Run the sheets perpendicular to the floorboards or perpendicular to the long side of the particleboard, whichever applies. This direction maximises the bridging effect.
Leave a 3 mm expansion gap between adjacent sheets and against all walls. The gap is filled with flexible sealant before tiling.

Step 3: Cut the sheets
Use a fibre cement scoring tool to score along a marked line, then snap the sheet over a straight edge. For curved or notched cuts (around toilet flanges, pipes, vanity bases), use a fine-tooth handsaw, a jigsaw with a fibre cement blade or a hole saw.
Pre-cut all sheets to size before applying adhesive. Once adhesive is on the back, you have a limited window before it skins over.
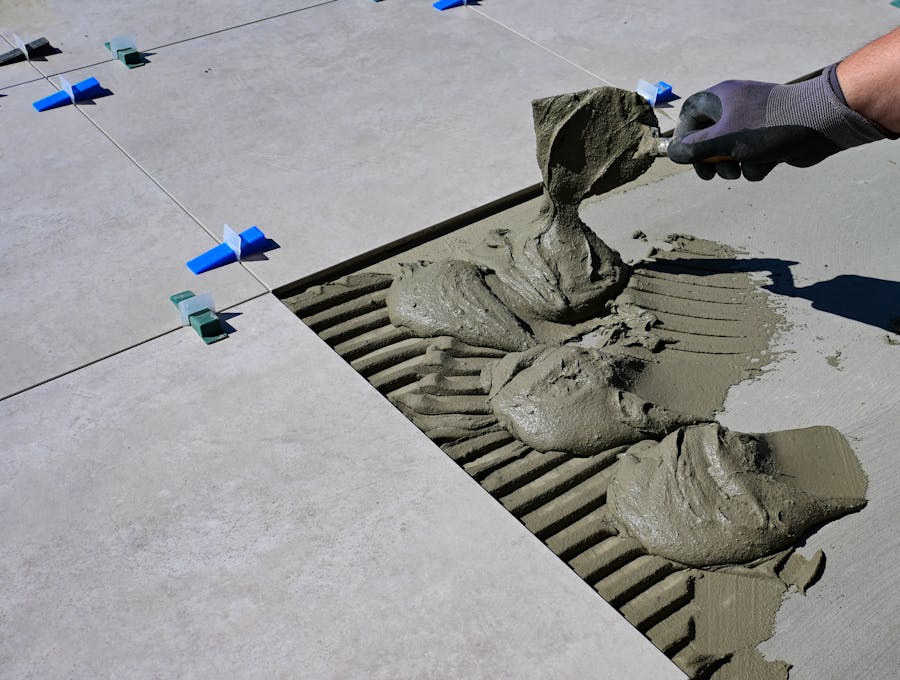
Step 4: Apply adhesive
Apply acrylic stud adhesive to the back of each sheet in continuous beads parallel to the sheet’s long edge, with beads spaced according to the manufacturer’s instructions (typically 200-300 mm apart). Some specs require the adhesive to be notched across the whole back with a trowel - check the product data sheet.
The adhesive does the bulk of the work holding the sheet flat against the substrate. The nails or screws are mechanical insurance against the sheet lifting before the adhesive cures.
Step 5: Position the sheet
Place the sheet down with the dotted face up. Press it firmly into the adhesive across the entire surface, working from the centre outwards to push out any air pockets.
Maintain the 3 mm expansion gap between sheets using offcuts as spacers.
Step 6: Nail or screw the sheet down
Drive an underlay nail (or specified screw) at every printed dot on the sheet. Start at the centre and work outwards, which prevents bulging.
Fixings must be flush with the surface. If a nail sits proud, it will telegraph through the tile bed. If it sits below the surface, it has fractured the fibre cement and the fix point is weakened.
The standard fixing recommendation is one nail per dot. Skipping dots compromises the sheet’s bond to the substrate and the floor will move under foot traffic.
Step 7: Seal joints between sheets
Fill the 3 mm expansion gaps between adjacent sheets and against walls with a flexible jointing compound or specified sealant. This stops moisture wicking into the gaps and provides a continuous waterproofing substrate.
Step 8: Waterproofing
In wet areas, tile underlay is not the waterproofing layer. A liquid-applied waterproof membrane goes over the underlay before tiling, taken up the walls in the shower zone and detailed at every penetration (drain flange, pipe, junction). This step is a certifier hold point in any owner-builder build - do not tile over uninspected waterproofing.
Common mistakes
Skipping the adhesive. Nailing alone is not enough. The adhesive does the structural work; the nails prevent the sheet lifting during the cure.
Aligning underlay joints with substrate joints. The whole point of underlay is to bridge across the substrate’s weak points. Aligning the joints defeats the purpose.
No expansion gap. The fibre cement expands very little, but the substrate may move with humidity and temperature. Without a gap, sheets can buckle at the joints.
Treating underlay as waterproofing. It is not waterproof. A separate membrane is mandatory in wet areas under Australian Standards.
Driving fixings proud or below the surface. Proud fixings show through the tile bed. Recessed fixings have fractured the sheet and no longer hold properly.
Tile underlay: FAQ
Can I tile directly onto plywood or particleboard without underlay?
No. Plywood and particleboard expand and contract too much with humidity and the tiles will crack at the joints. Tile underlay is a code requirement in wet areas under Australian Standards AS 3958 for tiled finishes over timber.
What thickness of tile underlay do I need?
6 mm is standard for residential floors with normal joist spacing. Thicker underlays (9 mm or 12 mm) are used for floors with wider joist spacing or where extra stiffness is required. The manufacturer's installation spec dictates the right thickness for your floor.
Do I need underlay over a concrete slab?
No. Tiles can be laid directly onto a clean, sound slab using tile adhesive (and a self-levelling compound if the slab is out of tolerance). Underlay is specifically for timber and sheet timber substrates.
Newsletter
Follow the build
One documented Coorparoo project - the costs, the approvals, the calls we would reverse. Lessons that translate, straight to your inbox.